Click to Chat tracks user interactions, like clicks on the WhatsApp icon/button, using Meta Pixel. The plugin will not install Meta Pixel itself. Instead, it will send events based on your existing configuration and the plugin’s settings. You can customize these events through the plugin’s settings to ensure they track user interactions as desired.
Steps to Set Up Meta Pixel Tracking
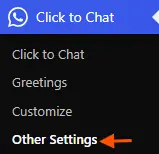
- Navigate to ‘Click to Chat’ on the WordPress dashboard. Then to ‘Other Settings’ – ‘Analytics’.

- Enable the Meta Pixel option [By default].
Once enabled, an event is sent to Meta Pixel whenever someone clicks the WhatsApp button on the website.

In Click to Chat:number,title, andurlare available in both free and pro versions. _ga and gclid are pro-only variables for advanced tracking.
Event Type:
Custom Event: This refers to a specific interaction or action defined by the user that is not part of the standard events provided by a platform. Custom events allow for tracking unique actions that are relevant to the business or website.
Standard: This refers to predefined events that are commonly recognized and used across platforms. Standard events have specific purposes and are designed to streamline tracking and reporting of user interactions.
Event Name:
A specific name for the event that identifies the action being tracked. This helps you understand exactly which interaction took place.
Example: The event name could be something like Click to Chat by HoliThemes.
Event Parameters:
Additional data that provides more context or details about the event. These can be specific values such as the button’s location, the URL of the page, or any other relevant data.
Example: Parameters for the Click to Chat by HoliThemes event might include the page URL, button text, or user type
Understanding the Event Parameters
When a user clicks the WhatsApp button, the following data is sent to Meta Pixel:
- Number: This parameter captures a unique identifier related to the chat session or counts the number of times the chat button has been clicked.
- Title: This represents the title of the page where the event occurred, helping to identify the specific page the user was on.
- URL: This captures the full URL of the page where the event took place, allowing for precise tracking of where the interaction happened.
These parameters help track exactly where and how users interact with the WhatsApp button.
- Event name: Click to Chat by HoliThemes
- Category: Click to Chat
- return_type: Chat/group/Share
- ID: {WhatsApp-Number/Group_id/Share_text}
- Title: {post_title}
- URL: {post url}
Dynamic Values [PRO]
In the PRO Version of ‘Click to Chat’, dynamic variables can be used to automatically pull information from URL parameters or cookies.
- URL Parameters:
Wrap the parameter name in square brackets[ ]to capture values from URL parameters.
Example:[utm_source],[gclid].
If the parameter is missing, it will return blank. - Cookies:
Wrap cookie names in double square brackets[[]]to capture values from cookies.
Example:[[_ga]].
If the cookie doesn’t exist, it will return blank.
Viewing Meta Pixel Events
After setting up Meta Pixel on your website, it’s essential to track user actions and ensure your events are firing correctly.
1. Go to Meta Events Manager
- Access Events Manager: Navigate to the Meta Events Manager.
- Select Your Pixel: Choose the Pixel linked to your website from the list of available data sources.
2. View Real-Time Events
- Overview Tab: In the Events Manager dashboard, go to the Overview section.
- Monitor Real-Time Activity: Here, you’ll see real-time events such as PageView, AddToCart, Purchase, and more as users interact with your site.
3. Troubleshooting
If events aren’t showing or firing correctly, you can:
- Use Meta Pixel Helper: Download the Meta Pixel Helper Chrome extension for diagnosing issues.

Additional Resources
Create Event from Google Tag Manager using dataLayer – send to Google analytics – Click to Chat
Google Ads Conversion for Click to Chat Plugin
Event Tracking for WhatsApp Button with Click to Chat Plugin in Google Analytics