The Click to Chat plugin by HoliThemes enables seamless communication between you and your website visitors via WhatsApp. These step-by-step instructions outline the process to install, activate, and configure the Click to Chat plugin on your WordPress website.
Step 1: Log In to Your WordPress Admin Dashboard
Open your browser and navigate to your WordPress admin area by entering your website URL followed by /wp-admin (e.g., https://yourwebsite.com/wp-admin).
Enter your administrator credentials to access the dashboard.
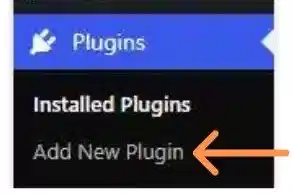
Step 2: Navigate to the Plugin Installation Page
In the left-hand menu, hover over Plugins and click on Add New.
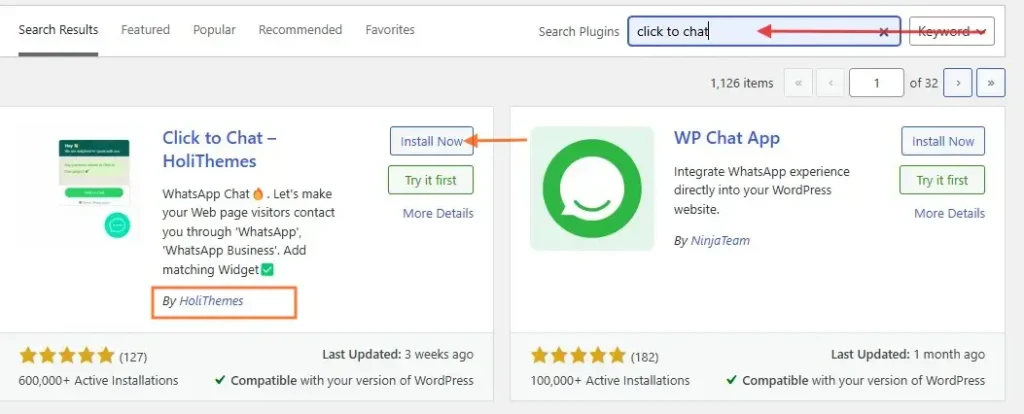
Step 3: Search for the “Click to Chat” Plugin
In the Search Plugins box in the top-right corner, type “Click to Chat.”.
Wait for the search results to populate.
Step 4: Install the Plugin
Locate the Click to Chat plugin by HoliThemes in the search results.
Click the Install Now button next to the plugin.
WordPress will automatically download and install the plugin.
Once the installation is complete, the Install Now button will change to Activate
Step 5: Activate the Plugin
Click the Activate button to enable the plugin on your website.
Step 6: Configure the Plugin Settings
After activation, return to the plugins page.
Find the Click to Chat plugin and click Settings, or navigate to Settings > Click to Chat in the left-hand sidebar.
On the settings page:
Enter your WhatsApp number.
Customize the chat button settings, including button text, position, and styling options.
Save your changes by clicking the Save Changes button at the bottom of the page.
Step 7: Verify the Plugin Functionality
Visit the front end of your website to ensure the WhatsApp chat button is displayed as expected.
Click the button to test if it redirects correctly to your WhatsApp chat.
Additional Tips for Optimization
Keep the Plugin Updated: Regularly check for updates under the Plugins section to ensure optimal functionality and security.
Advanced Customizations: Refer to the plugin documentation or support forum for guidance on advanced settings and troubleshooting.